Tuesday 30 October 2012

Happy Halloween by Jennie

Hi!
I love being able to join my wonderful team here on the blog, and even if time has run away again with me this month, I managed to get time to make a Halloween ATC for you. This is so simple to make, takes a few minutes, and can be adapted for any occasion.
I use some of Tim's Kraft Resist Halloween paper, and added distress inks to it to make the skull pop off the page. I stamped Happy Halloween and a spiders web from one of Tim's Stamper's Anonymous stamp sets in Black Archival ( one of my staples of stamping!) and then added orange and brown distress inks , and cut it out.


The pumpkin was made using a honeycomb paper , which I die cut from the Alterations mini pumpkin, and then cut in half, and fanned out.


You will often find me in the baking department of shops, looking for silicone moulds so that I use them with UTEE, which is what I have done with the skull. I just used up what UTEE I had left in my melting pot, and luckily it was the perfect colour. The bat was another find in the seasonal department of a well known supermarket! Add all the elements together, and glue with a hot glue gun.


Have a very Spooky Halloween, and if you are in our direction on Wednesday night, we will be tricking and of course treating you to a late night shopping. we are open until 9pm.

Have a very creative day
Hugs
Jennie

Sunday 28 October 2012

Through the arches... Last Guest Designer Post by Yvonne Fay

I can't believe it's almost the end of October already!  I've so enjoyed my time as Guest Designer, thank you to Emma and Jennie for giving me the opportunity, and for the great products too!  Thanks also to everyone who was kind enough to take the time to leave comments.

For my last project I thought I would do another card, something a little bit different...
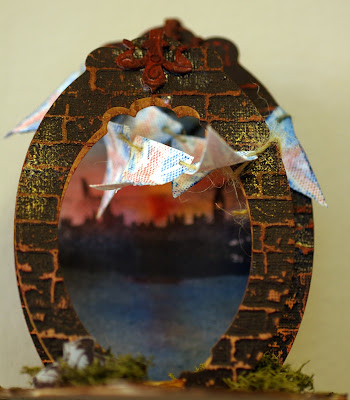
London through the arches
To start, I cut the base from chipboard, the background from watercolour paper and 2 oval frames from co-ordinations paper, it then embossed the frames with a brickwork texture fade, then sanding off some of the raised areas.
Base, background and arches

sanded arches
For the background, I firstly coloured with PanPatels to create a night sky, then stamped the London scene from the London plate, masking off the top with a piece of torn paper as I didn't want a hard edge. I then stamped the fly birds from the Birds of a Feather Plate at the top.
Now, at this point I forgot to take step-by-step photos, but it's not too difficult to construct.
Score and fold the bottom of the background and stick to the base, which has been inked with distress ink and stenciled with puff paint and gilding cream.  To join the arches and background together,and to al low them to fold down to fit in an envelope I used grungeboard hinges coloured with distress ink and gelatos.

For the bunting I stamped the bunting from the London plate onto canvas with gelatos - colour the stamp with the gelatos then mist lightly with water. I cut the bunting apart, hole punched, then strung on some twine and draped around the arches.

As a wee detail, I stamped the sneakers stamp onto shrink plastic and added to the base of one of the arches along with some moss to finish off.  I hope you like my last project and I've added a few close up photos below to show some of the detail.  Thank you for looking,

Bye, Yvonne.


Saturday 27 October 2012

A Little Bit Spooky...

Hello everyone!
Can you believe it, we are nearly at the end of October and Halloween is just around the corner.
Well, my project today is not strictly a Halloween project, but it has a sort of halloweeny, spooky feel to it, at least I think so.
It's a collage made out of 4 ATCs.
I started by taking 4 ATC (2.5 by 3.5") sized bits of smooth stamping card and blended 4 colours of Distress Inks over them with my Ink Blending Tools. I then added some stamping using the Distress Inks and the Chicken Wire and Regency Background stamps  and then, while the ink was still wet, sprinkled some Perfect Pearls powder over them. Once dry I brushed off the excess. The next step was to do some more stamping, this time I used black Archival Ink and  stamps from the set: Architecture A 4. Two more bits of stamping followed, this time using Gesso and the Swirls, Splats & Dots stamp
Stamping with Gesso is great fun. You spread out a thin layer on your craft mat and then use that like an ink pad. Just make sure you clean your stamps straight away with some running water, as Gesso dries fast. I added a second layer, this time using a stamp from Tim Holtz's Attic Treasures set. I also added some strips of paper from an old book page.
Now for the final touches. For my vocal image I stamped one of the new Donna Rodgers stamps "Age" with Black Archival ink onto white card. I cut it out and coloured lightly with some Distress inks.I now mounted my 4 ATCs on a piece of black card and glued the Donna image in front. I also added the Word Carpe Diem from the  Journaling Words 3 set. I added some embellishments from my stash and gave it some spritzes of Perfect Pearls Mists to tie it all together. I also did a bit of shading with a charcoal pencil around the main images..
I'll leave you with a few detailed pictures, until next time!


Wednesday 24 October 2012

BOO!! ...by Emma


Hi everyone, it's Emma here and I'm back with my final share of October. I'm one of those people who really loves Halloween and I thought I'd make the most of my much loved Halloween Tim Holtz dies and make another tag using them...as always, I hope you like it! 
To begin with, I took one of the larger sized tags and covered it in Spiced Marmalade and Mustard Seed Distress Stain. I blended Black Soot around the edges before stamping the entire tag, using the Marbled Background stamp inked with Spiced Marmalade DI. I then used the gorgeous Spider's Web  and spider stamps from Tim's Halloween Cutout set and stamped the web and the spider directly onto my tag.
Next I covered a piece of chipboard with a self adhesive metal sheet and then die cut the BOO using the Gothic Boo die from Sizzix. I applied Hazelnut and Eggplant Alcohol ink over the top of the metal and attached this to my tag.
I inked up a piece of white paper, with Old Paper DI and then stamped the tickets and the Calligraphic stamp onto the paper and cut them to size, distressing the edges with the distressing tool and some Black Soot DI. I added these to my tag, together with one of Tim's Pen Nibs and a Corked Vial, which I dropped a few drops of Alcohol Ink into.
I die cut some of the bats from Grungepaper, using the Movers and Shapers Mini Bat and Skull die and painted them with Black Adirondack ink. I added the bats to my tag, together with some black vintage ribbon and fibres from my stash.
If you're inspired to make a tag of your own, then here's a list of what I used:


Thank you for stopping by to take a look at my tag and I can't wait to read all your comments!
That's it from me for now but I'll see you all again, soon!
Emma x

Monday 22 October 2012

St...st...st...STeamPunK by Titbelsoeur

Hi There, Salut les Cop's !
The page I am showing you today was made to be sent to a friend of mine, for her circle journal... sure you guess the subject of the journal !
Steampunk, yes you right !
I LOVE the steampunk style ! to make the background, I have used some masks and stencils like the Mini Gear template and, amongst others, the fabulous Tick Tock and Cogs Background plates. Ranger inks sprayed or stamped, and that's it...


An Old Lady and a young one... the young one needed some jewels, thus I opened my toolbox to gem her with cogs, coins and watch mechanisms :


I hope you like my steampunk style,
thanks for stopping by, 
I am looking forward to reading your comments ! 
See you again soon...

Saturday 20 October 2012

A Christmas Wish by Alison

Hello Stampers!
I expect many of you have started making Christmas cards, as the Season is fast approaching. Here's one I've made, using one of my favourite techniques, stamping into ultra thick enamel.
I started by die-cutting the Sizzix snowflake border. I kept the waste, to go at the top of my card, and the snowflake border to go at the bottom. Then I inked both pieces with versamark embossing ink, & embossed 3 layers of Sapphire Jewel Enamels. Whilst the third layer was still molten, I stamped the Snowflakes into one side of each piece. The Snowflakes didn't cover the whole pieces, so after carefully reheating the other sides with my heat gun, I stamped some more snowflakes.
To make my background, I inked a square of white card, using tumbled glass & vintage photo Distress Ink. I stamped the Script from Calligraphic Mat 15 with vintage photo DI and the Snowflakes with broken china DI. Then I carefully positioned and stamped the greeting from the Christmas Greetings 1 plate, using jet black Archival Ink. I inked the edges of my background with more vintage photo DI.
Next, I die-cut 2 Sizzix Baubles from white card. I used the 'Wish' mover & shaker die on one of the pieces, then triple embossed this with Fire Opal Jewel Enamels. Whilst the third layer was still molten, I stamped the Script into it, using black Archival Ink.
For the background to the bauble, I inked lightly with vintage photo DI. I actually used just the ink that was left on the blending pad, from the main background. Then I stamped the Snowflakes with broken china DI. I glued the background bauble behind the embossed one, then tied a gold ribbon bow around the top.
To finish, I inked the edges of a square white card blank, then assembled my card as shown.
Here's a closer shot of the lovely shiny, stamped embossing. Can you see why I love this technique?!
Thanks for looking,
Happy Stamping!
Alison xxx

Thursday 18 October 2012

Raven treasure chest. By Zuzu


I am sharing this treasure chest style altered box this week. I have been readying myself for a steampunk Halloween event (lots of bands, entertainment, stalls and wonderful costumes) in Birmingham on the 27th of October. I have a wee stall there shared with a friend so have been making a LOT of boxes.

This is a nice big trunk shaped one and I have used the fantastic raven stamp "Airmail bird collage stamp" from HERE....
Apart from the stamp and a lot of paint and varnish etc, I also used one of the Ideaology ornate book plates and a set of the foundation feet from HERE...
See you next month
Z x

Tuesday 16 October 2012

Bird Tag by Sioux Jenneys

I'm here again to share a tag today :)


1. I made the background using Distress Inks faded jeans, Victorian velvet, and crushed olive swooshing them around on a non stick sheet drying and swooshing some more!! ;)

2. I stamped the bird from airmail bird collage in Archival black and then masked it...followed by stamping the music back ground in Distress Ink Victorian velvet.


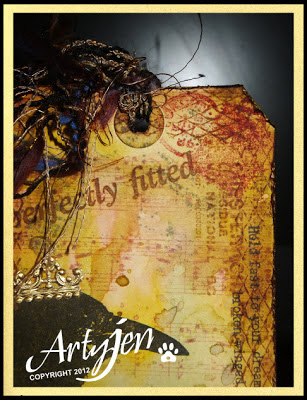
3. The little combo at the top was the stamp image (aged mahogany), ticket (vintage photo) and "perfectly fitted" (Archival coffee) from Ephemera 1.

4. "Free as a bird" and "Hold fast" quote stamped in Archival black.

5. The mini lattice wire was stamped round the edges in vintage photo, then the edges tattered and more vintage photo and aged mahogany used to age the edges.


6. For no other reason than I have a lot of spare cava tops
(I am the cava queen after all!!! LOL)
I added this in the corner with "dream" from mini journaling words...finished off with some bakers twine and a crown on the bird using a little bit of German scrap form my stash :)


I'll be back ;)
xoxo Sioux

Sunday 14 October 2012

Hands up who loves Halloween? by Yvonne Fay

I DO!!! I'm back with my second project as Guest Designer and I just had to do a Halloween project as I had a lightbulb(or battery operated tealight) moment when I saw the papier mache hand found here and then saw a small papier mache skull at Ally Pally that was just the perfect size.

I started off by performing a craniotomy on the skull so that I could create an opening to put a battery operated tealight inside.  I then painted the skull and hand with a coat of gesso.


Once the hand was dry I painted it with  green paint and the skull with pearl paint, then added a small metal screw eye and catch to the skull. The base with some Tim Holtz tissue paper
For the lace gauntlet I used some crushed grape dylusions spray, then I stamped the splat for from the Splats and Swirls plate on to some trimming and also the bird head from the Airmail Bird Collage elements stamp set  to make the frilled cuff around the hand.

Splatted

Bird head trim

Ruffled hand
The skull is suspended from the the hand using some waxed linen thread, sort of looks like a spiders web I think.
Ruffle detail

Some finishing details added from poundshop halloween spiders and a skull. Also a Tim holtz bottle stamped with label stamp from Tim Holtz Halloween set.


I hope that you all enjoyed looking at my project as much as I enjoyed making it
Happy Halloween!